On Scene: Two tips to drastically improve your crash scene photos
On Scene is a reoccurring series that shares tips for capturing critical crash scene evidence.


The takeaway:
Step back to take photos that show what you’re trying to show and where it is. After taking the wide shot, you can move in for a close-up.
Angles can create confusing and misleading perspectives, especially for measurements. Keep your photos straight and level if you can. Aim for 90-degrees from the surface you are photographing.
The worst photos are the ones that were never taken. Take photos and save them somewhere you can find them for years to come.
I’ve learned to be cautiously optimistic when it comes to crash scene photos taken by others. It’s usually safe to assume that scene photos taken by a police department will be pretty good (they’re almost always from a specialized crash team and only taken for the most serious crashes). The other ones though, like the ones taken by well-meaning bystanders, often leave much to be desired. Fortunately, a couple of simple tips can drastically improve the amount of detail and information that can be extracted from each photo. As a bonus, well taken crash scene photos can shave hours of an accident reconstructionist's billable work by eliminating the need for workarounds that compensate for bad photos.
Good Idea - Bad Execution
Crash scenes are chaotic. Adrenaline is rushing for everyone on scene and there’s an atmosphere of shock and confusion. As the drivers and their passengers compose themselves, at least a few of them will likely grab their phone and snap some photos of what’s in front of them. These photos are a very different type than they’re probably used to taking. Why? Because people usually know exactly what they want to take a picture of when they reach for their phone – their kid posing in a new outfit or the food they’re about to eat at the new place in town.
Most parties and witnesses to a crash have no idea what they should take photos of – they just know it’s a good idea to document what’s in front of them. If you’re not a crash investigator or accident reconstructionist, you’re probably not going to be able to identify critical evidence and properly document the scene. Your goal should be far more simple: preserve what’s in front of you so a specialist (like Evident!) can identify the important parts at a later date.
My advice to anyone that finds themselves acting as an impromptu forensic photographer? Do your best to capture the scene in a broad view instead of focusing on close-up details.
The Worst Offenders
The two worst offenders that I’ve seen repeated ad nauseam are what I’ll call the “Too-Close-Up” and the “Angled Measurement” photos.


The “Too-Close-Up”
This one always seems so obvious in hindsight. When you’re on scene, you have the full context of what’s around you. When an accident reconstructionist pulls your scene photos up on their computer months or years later, they can only see what you took a picture of!
Take a look at the picture above (top left) and ask yourself if you could figure out what part of the car you’re looking at from that photo. Too-close-up photos show the what but not the where - both are important pieces of the accident reconstruction puzzle. The photo on the top right clearly shows what the photographer was trying to take a picture of, a dent, but it does almost nothing to show where on the car the dent is located.
The fix for the too-close-up photo? Take a few steps back to get a wider shot! If you really want that close-up shot, start far enough back to capture some locational context then work your way closer like the example below. (This applies to skid marks and other roadway evidence as well.)


Better yet, keep backing up until your photos also show a unique landmark. Manhole covers, painted lane markings, crosswalks, or anything else that is likely to stay exactly where it is for the foreseeable future goes a long way to quickly locating where the car was in the intersection.

Trees and guardrails line many roads around the northeast, making them hard to use for precise location identification. This photographer stepped back far enough to show that there was a yellow fire hydrant in front of the car.
The “Angled Measurement”
Perspective can be a funny thing. The internet is full of photos with baffling perspectives that people like to argue over (remember the dress color debate?). We don’t want crash scene photos to baffle (or enrage) people! Sure, you can argue over the significance of what’s shown in the photo but everyone should at least be able to agree on what they’re looking at.
Keep your photos as straight, flat, and level as you can – angles are where perspectives can get weird. The tape measure photo on the bottom left is my favorite example of this. Let’s pretend you’re at the store measuring the height of a bookshelf for your home. You put the end of the tape measure on the floor and extend it until you reach the top of the bookshelf. Now you need to actually read the measurement so you crouch down and get your eye level with the top of the bookshelf, right? That’s exactly how you should take a picture of a measurement too!

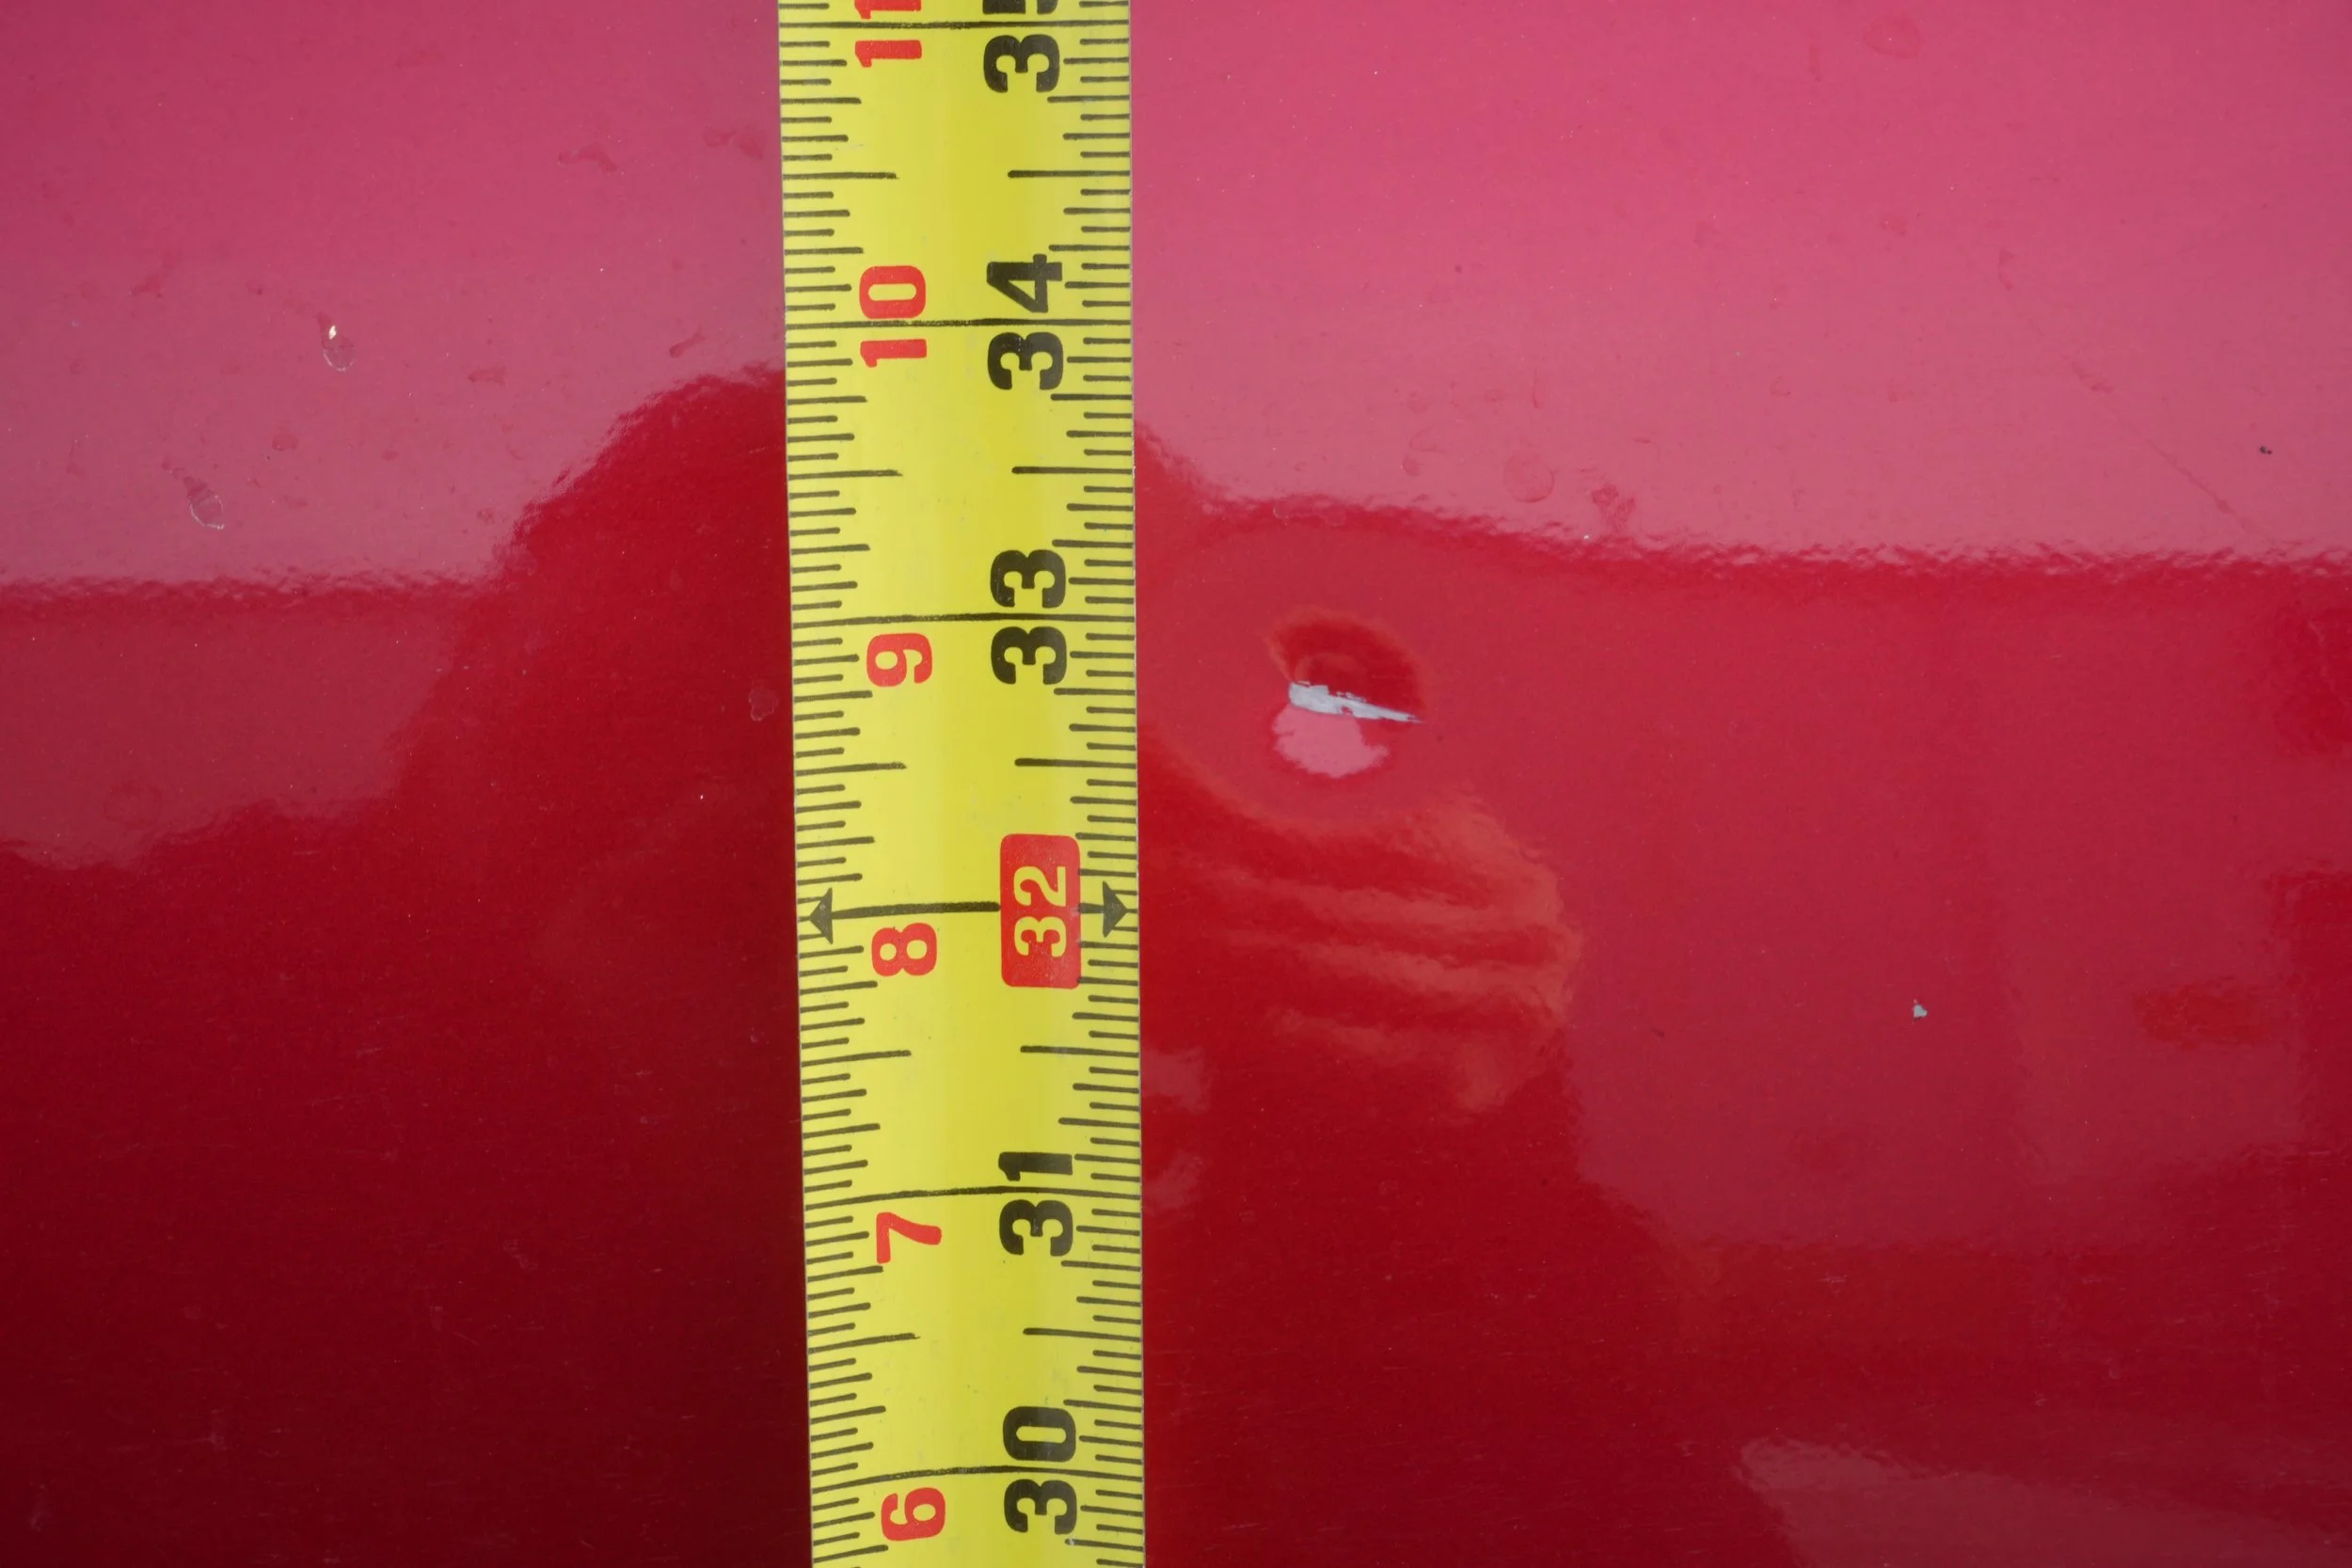
Look at the photo above (top left) and ask yourself what the height of the dent is. Now look at the top right photo and ask again. On the left, you may say it’s 34” or maybe 33” - 33 1/2” if you’re trying to account for the angle. On the right, there should be no debate that the center of the dent is right around the 32 3/4” mark. This tip isn’t just for tape measures but it’s most useful for accurately showing the distance between to points of interest.
I suspect that the reason for the angled measurement photo is nearly always the same - trying to hold the tape measure in one hand while taking a photo with the other. To work around that issue, try bending the tape measure 90-degrees, locking the tape measure in the extended position, and placing the body of the tape measure on top of the car. Spend a moment making sure the tape measure is standing as upright as possible (no leaning forward/backward or side-to-side) then take your time getting the measurement photo just right (without all of the fumbling of the tape measure). I like to take a wide shot of the tape measure setup before moving in for the close-up shot. This eliminates the “too-close-up” issue from the first tip and confirms that the measurement was taken from the ground.


Final Thoughts
Scene photos are powerful tools in the effort to get answers about what happened in a crash. Good photos can help quickly resolve disputes while bad photos can spur new arguments (that may cost thousands of dollars to resolve with the help of an accident reconstructionist). Make no mistake, some photos are better than no photos at all. The worst photos are the ones that were never taken so, please, take photos and save them somewhere you can find them for years to come.